


Resource
Optimising Beer Fermentation with AWS SiteWise and Raspberry Pi
Published on 16 Sep, 2024 by Raviprakash
Beer fermentation is the critical phase in brewing where yeast converts sugars in the wort[1] into alcohol and carbon dioxide, giving beer its characteristic alcohol content and carbonation. The process begins when the cooled wort is transferred to a fermenting vessel and yeast is added. Fermentation is not just about time, but about controlling the conditions to achieve the desired beer profile. Temperature control, in particular, plays a pivotal role in this process, influencing the speed of fermentation and the flavours developed in the beer. Different beer styles and yeast strains require specific temperature ranges, making it essential for brewers to monitor and adjust temperatures carefully. The fermentation process can be broken down into distinct stages—lag, active, and maturation—each with its own unique requirements and impact on the final product.
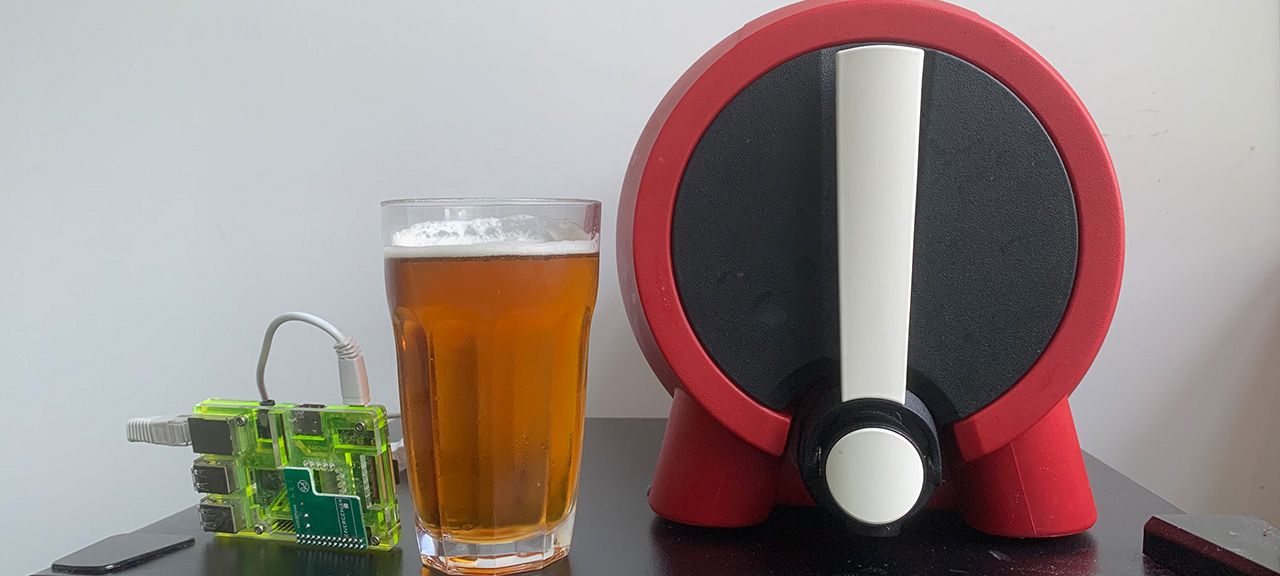
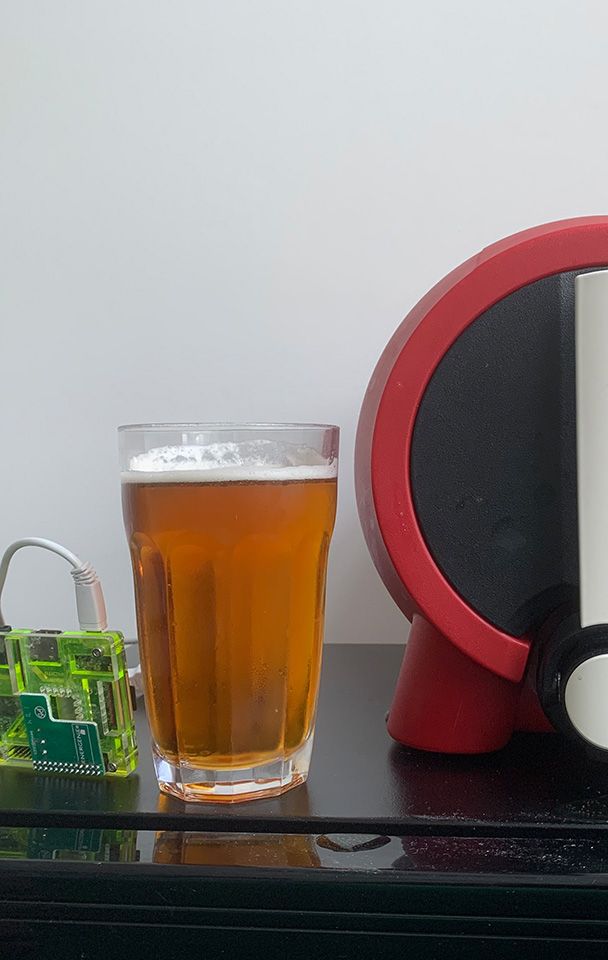
To optimise the fermentation process I'm using a Raspberry Pi equipped with iSpindel sensors to monitor critical parameters like temperature and CO2 levels. The Raspberry Pi is the central hub, collecting real-time data and sending it to AWS SiteWise for visualisation, precise monitoring, and control. This also allows me to set up alerts for temperature deviations and automatically adjust the fridge’s temperature. This closed-loop system ensures that the beer ferments under the most favourable conditions, reducing the risk of off-flavours and improving the overall quality of the brewing.
This blog focuses on the interaction between Raspberry Pi and the AWS SiteWise interface, explaining how they are connected, what intermediate services are needed, and the key components that link everything together for data transmission and visualisation using powerful cloud services. The aim is to enhance the precision and reliability of beer fermentation, ensuring that each batch meets the highest quality standards.
[1] Wort is the liquid extracted from the mashing process during the brewing of beer or whisky.
The Critical Role of Temperature in Industrial Beer Fermentation
Temperature control during fermentation is arguably one of the most critical factors in brewing. Each yeast strain operates optimally within a specific temperature range, and slight variations can significantly affect the outcome of the beer. For example, higher temperatures can speed up fermentation but often at the cost of introducing off-flavours and undesirable attributes. Conversely, lower temperatures can slow down the process and, in some cases, stall it entirely, especially if the yeast is outside its ideal temperature range.
The importance of maintaining the correct fermentation temperature varies with the type of beer being brewed:
- Ales typically ferment at warmer temperatures (62-75 °F or 17-24 °C). The yeast rises to the top, where it can be skimmed off for reuse. Maintaining a consistent temperature within this range is crucial to achieving the desired flavour profile and avoiding off-flavours.
- Lagers ferment at cooler temperatures (46-58 °F or 8-14 °C) and take longer due to the slower yeast activity. After active fermentation, lagers often benefit from a step-cooling process, which helps clear the beer and reduce unwanted flavour compounds.
- Wheat and Belgian Beers can ferment at higher temperatures, particularly styles like Saisons, which may use yeast strains that operate well at temperatures as high as 85°F (29°C).
- Kveik Yeasts are unique in that they can ferment effectively at very high temperatures (30-40°C or 86-104°F), making them versatile and efficient for specific brewing styles.
During the active fermentation phase, precise temperature control is essential. For ales and wheat beers, maintaining a stable temperature helps reduce diacetyl, a compound that can give the beer an undesirable buttery flavour. Lagers, on the other hand, may require a gradual increase in temperature towards the end of fermentation to help clear up the beer and reduce unwanted compounds before chilling it for maturation.
Sensors can be employed to monitor the temperature at different stages of fermentation, Raspberry Pi and AWS SiteWise can be used to track and adjust temperatures in real-time. This technology-driven approach ensures consistency and also provides valuable data that can be used to refine and improve the brewing process over time.
By understanding and controlling the temperature during fermentation, brewers can significantly influence the quality, flavour, and character of the beer, making it a critical factor in both home brewing and industrial-scale production.
Integrating Raspberry Pi with AWS SiteWise
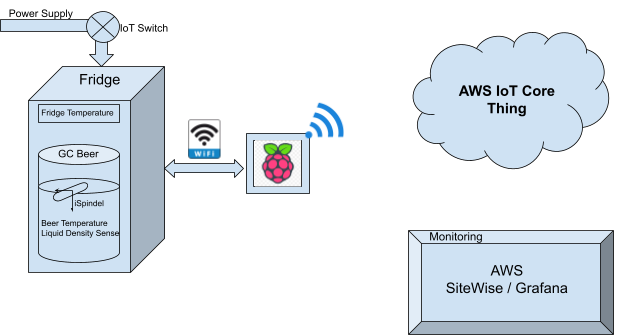
To achieve this, I am using a Raspberry Pi 3 as the central hub for collecting and processing data. The system includes an iSpindel sensor (a cylindrical sensor which tilts as the liquid density changes in relation to its centre of mass) and provides temperature data. Additionally, an IoT-enabled control switch is connected to the fridge power supply, allowing the Raspberry Pi to automatically turn the fridge on or off to maintain the desired beer temperature.
The Raspberry Pi gathers sensor data, processes it, and sends it to AWS IoT Core. From there, the data is forwarded to AWS SiteWise, where it is visualised on a dashboard with real-time plots. This setup enables remote monitoring of the fermentation process from anywhere. Furthermore, the system is configured to trigger alerts through AWS if any abnormal conditions are detected, ensuring timely intervention to prevent any issues during fermentation. The diagram below shows the complete integration of Raspberry Pi with AWS cloud services.

Why Raspberry Pi
The Raspberry Pi 3 is an essential component in this setup, acting as an edge device that bridges the gap between the physical sensors and the cloud. Equipped with a quad-core 1.2 GHz Broadcom BCM2837 processor, 1 GB of RAM, and integrated networking capabilities like 2.4 GHz 802.11n Wi-Fi, the Raspberry Pi is well-suited to handle the demands of this project.
Using Python, we integrate Raspberry Pi with the sensors. The scripts manage data collection, filtering, and control signals sent to the fridge power. Also connects to AWS IoT Core, ensuring that the data is properly labelled, timestamped, and sent to the cloud.
How iSpindel Sensor works to collect important data
The iSpindel sensor is a versatile, hydrometer used to monitor the fermentation process in brewing. It is designed to measure both the temperature and the specific gravity (density) of the beer, which helps brewers track the sugar content and fermentation progress. The sensor consists of a tilt mechanism that changes its angle based on the density of the liquid. As the fermentation process progresses and the sugar content in the beer decreases (as the yeast converts sugar into alcohol), the tilt angle changes accordingly. This tilt data, combined with temperature readings, allows the iSpindel to calculate the specific gravity of the beer, giving brewers a clear understanding of the fermentation status.

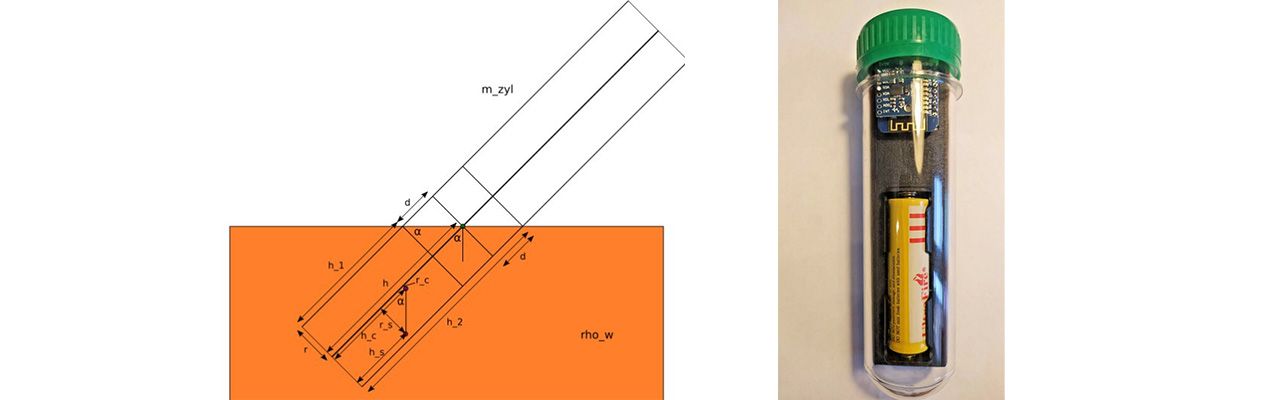
The iSpindel, powered by a battery, connects to the same Wi-Fi network as the Raspberry Pi, allowing it to wirelessly transmit data to the device. The system will measure the sensors at every x-minutes and send its tilt angle, temperature and battery voltage to pi, this idea eliminates the need for physical connections, making it a convenient and efficient solution for home brewers and commercial brewers alike.
Close loop system
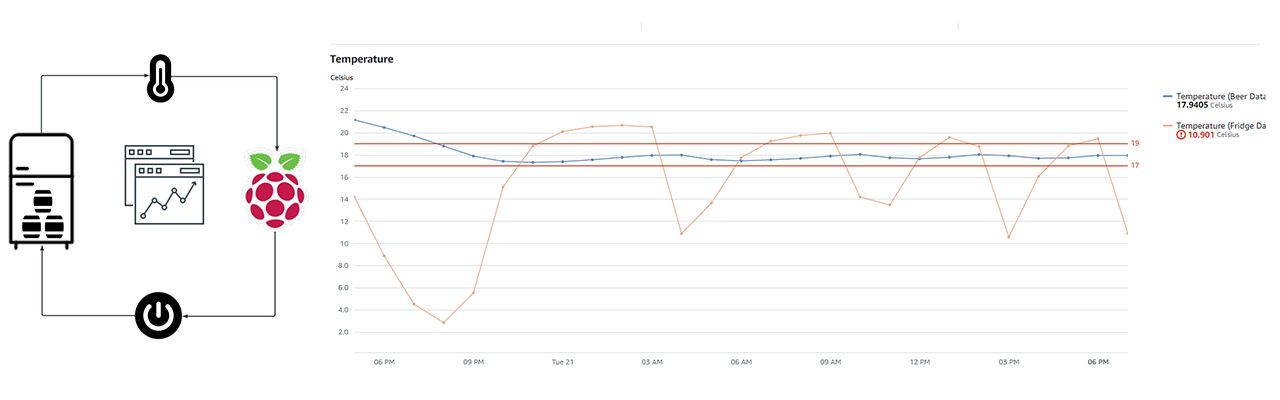
The hardware integration operates within a closed-loop system, where the brewing process takes place in a temperature-controlled fridge. The Raspberry Pi continuously monitors the beer's temperature in real time. If the temperature drops below the desired threshold, the fridge is turned on using an IoT-enabled switch. Conversely, if the beer's temperature rises above the set threshold, the fridge is turned off to maintain optimal conditions. The decision to turn the fridge on or off is made locally by the Raspberry Pi, ensuring that temperature control is maintained even if the system temporarily loses its internet connection.
The telemetry data, such as the temperature readings and system status, is sent to the cloud using AWS IoT services. Even if the system goes offline, the closed-loop control ensures that the temperature remains regulated locally, preventing any disruption in the brewing process. In the following diagram, you can see the block diagram of this closed-loop system and a graphical plot of the temperature data. The red line represents the fridge temperature, while the blue line indicates the beer temperature, which remains within the defined upper and lower thresholds throughout the process.
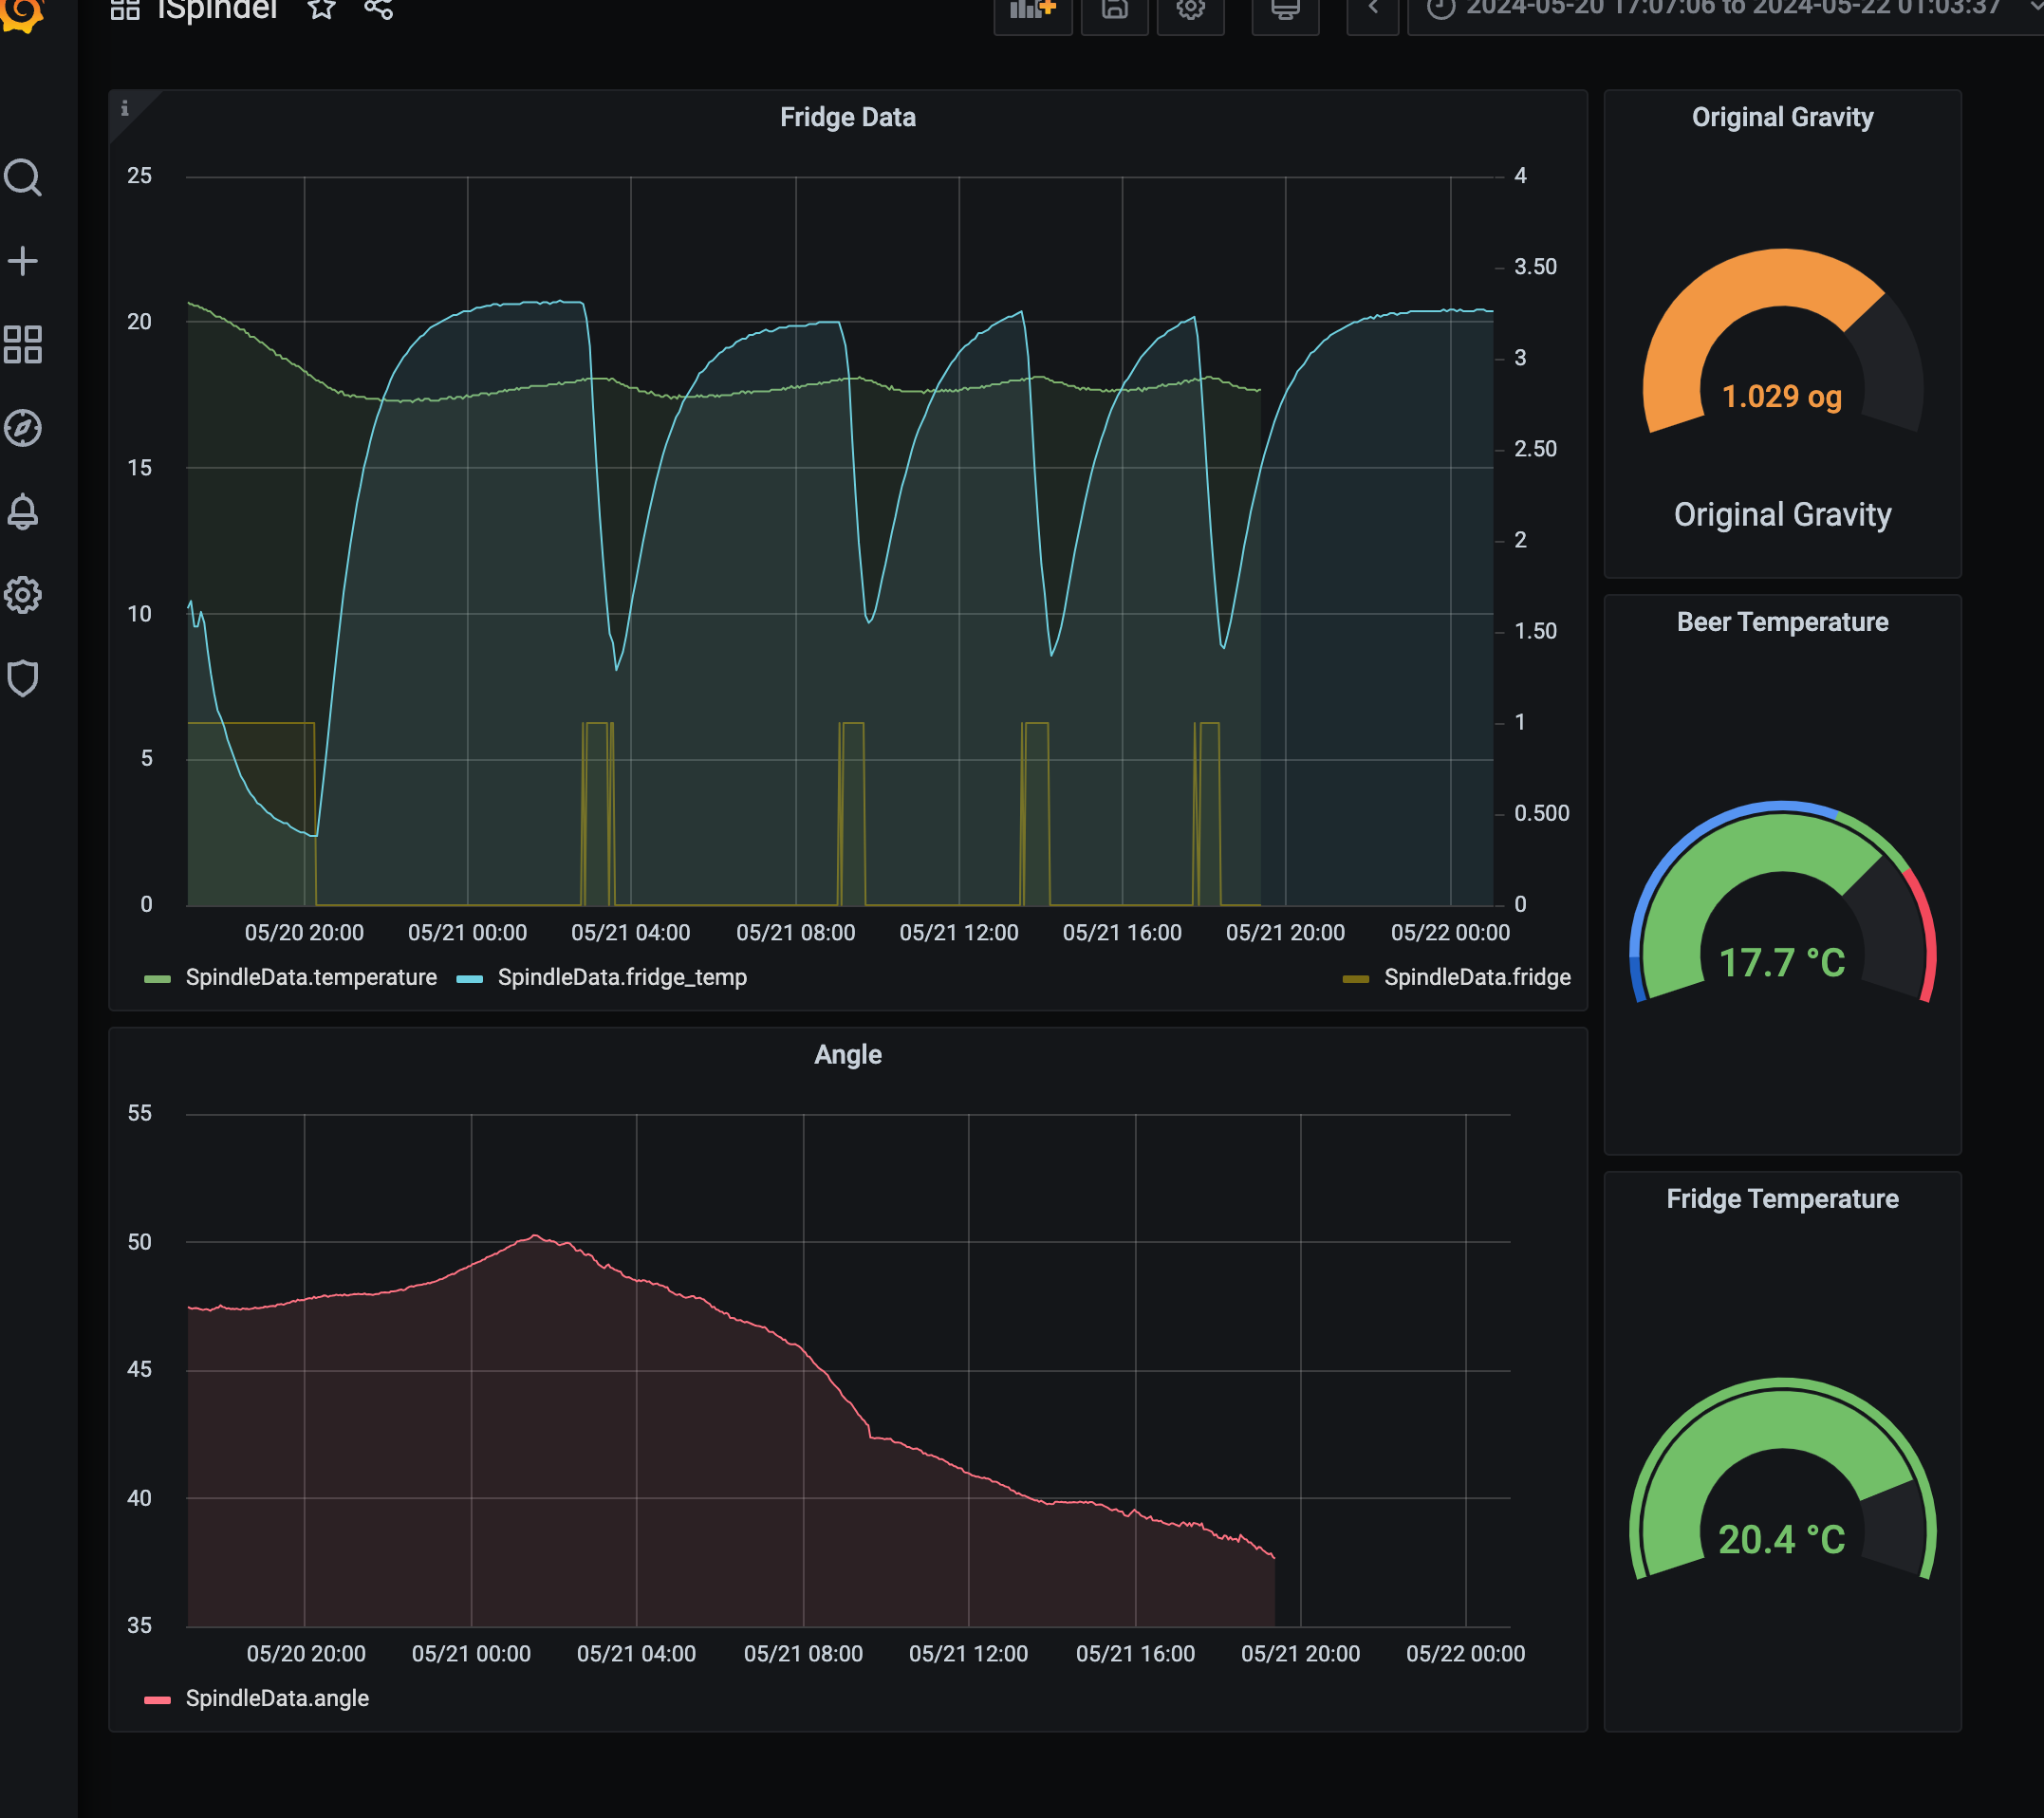
We also set up Grafana on a Raspberry Pi to locally monitor the fridge and beer temperature, including the switch’s ON/OFF state and other parameters. In this blog, we will focus on Raspberry pi communication with SiteWise, which is explained in detail in the following section.

Software Environment Setup for Python and AWS IoT Integration
In this project, we utilised Python 3.10.x along with the Pipenv environment to manage dependencies and virtual environments efficiently.
1. Check the correct version of python is installed in your Raspberry Pi.
python --version
2. Install Pipenv - Pipenv is a powerful tool that simplifies dependency management.
pip install pipenv
3. Set Up the Project Environment
pipenv install awsiotsdk awscrt
4. Configure AWS CLI
aws configure

AWS Access Key ID [****************UOQ4]:
AWS Secret Access Key [****************yPnz]:
Default region name [eu-west-2]:
Default output format [json]:
5. After writing the python script you can run it in pipenv by
pipenv run python ./main.py
Why AWS SiteWise is the best solution for data collection and visualisation
AWS IoT SiteWise works by connecting industrial equipment to the cloud, where data is collected, processed, and stored for analysis. It integrates with AWS IoT Core, allowing devices to send data using the MQTT protocol. Once the data is received, IoT SiteWise applies pre-configured rules to map the data to specific assets and properties.
Users can create assets and models that represent their physical equipment, defining relationships and data flows. The collected data is then visualised on dashboards, providing real-time monitoring and insights. Additionally, users can set up rules to trigger alerts or actions based on specific conditions.
AWS IoT SiteWise data flow from Raspberry Pi
In this section, we'll explore how data flows from a Python script running on a Raspberry Pi to AWS IoT SiteWise. This process involves several steps, from connecting your device to AWS IoT Core to routing the data to SiteWise assets and models. Below is a detailed breakdown of each stage.
1. Sending Data from Python Script to AWS IoT Core. The Python script collects sensor data (such as temperature, humidity, or other metrics) and publishes it to AWS IoT Core using the MQTT protocol. To achieve this, you'll need to install the AWS IoT SDK for Python (boto3 or awsiotsdk) as shown below, which allows your script to securely connect to AWS IoT Core and send data. Here is the python script to connect with aws iot using awsiotsdk.
from awscrt import mqtt, http

from awsiot import mqtt_connection_builder

from datetime import datetime

import json


class aws_mqtt:

    def __init__(self,topic):

        self.endpoint = "a******s.iot.eu-west-1.amazonaws.com"

        self.clientID = "testDevice"

        self.certificate = "certificates/a********-certificate.pem.crt"

        self.privatekey = "certificates/a************-private.pem.key"

        self.rootCA1 = "certificates/AmazonRootCA1.pem"

        self.message = "Connect to AWS"

        self.topic = topic


    def connect(self):              #put connection status return code

        try:

            self.mqtt_connection = mqtt_connection_builder.mtls_from_path(

                                    endpoint=self.endpoint,

                                    cert_filepath=self.certificate,

                                    pri_key_filepath=self.privatekey,

                                    #client_bootstrap=client_bootstrap,

                                    ca_filepath=self.rootCA1,

                                    client_id=self.clientID,

                                    clean_session=False,

                                    keep_alive_secs=6

                                    )

            print(f'Connecting to {self.endpoint} with client ID {self.clientID}')

            print(f'Connection return para {self.mqtt_connection}')

            # Make the connect() call

            connect_future = self.mqtt_connection.connect()

            #.result() waits until a result is available

            if connect_future.result():

                print("Connected!")

                return True

            else:

                return False

        except:

            print('Connection not established')

            return False


    def publish(self, message):

        getdata = self.mqtt_connection.publish(topic=self.topic, payload =

            json.dumps(message), qos=mqtt.QoS.AT_LEAST_ONCE)

        print("Published: '" + json.dumps(message) + " to the topic: " + self.topic)

        return True


    def senddata_to_cloud(self,data):

        status = False

        if self.connect() == True:

            for i in range(len(data)):

                    if self.publish(data[0]):

                        print(data[0])

                        data.pop(0)

                        status = True

            self.disconnect()

        return status
2. Connecting to AWS IoT Core. To securely connect your Raspberry Pi to AWS IoT Core, you need to configure an IoT Thing in the AWS Management Console:
Create a Thing: In AWS IoT Core, create a Thing that represents your Raspberry Pi or device. This Thing serves as the digital twin of your physical device in the cloud.


Attach Certificates and Policies: Generate a certificate and attach it to the Thing. Then, create an IoT policy that defines the permissions your device needs, such as publishing messages to specific topics.


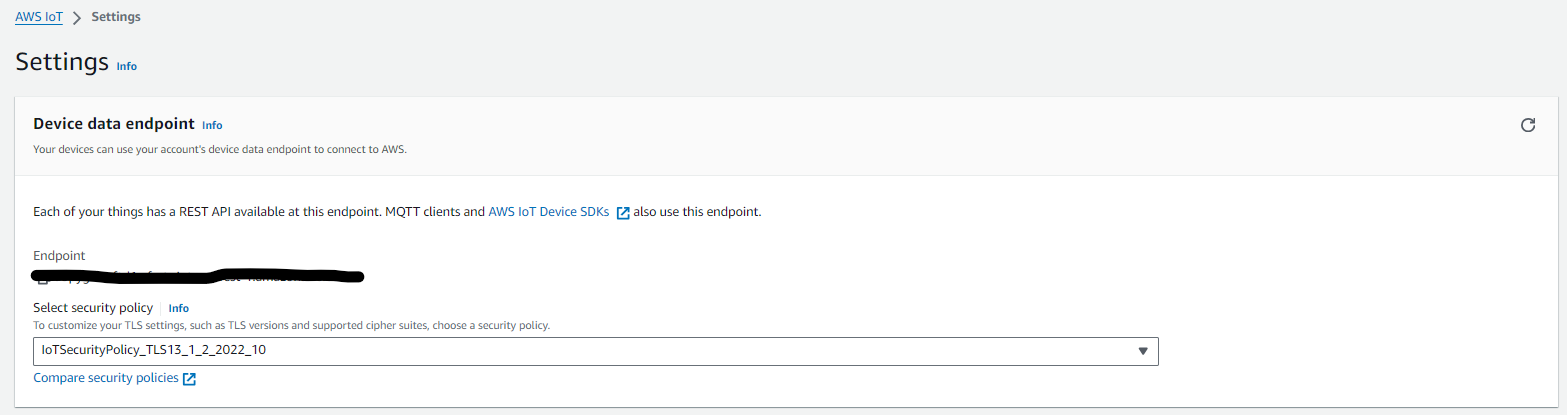
Connect Using the Endpoint: The Python script on your Raspberry Pi will connect to AWS IoT Core using the assigned IoT endpoint, certificates, and policies. Once connected, the device can start sending data to the cloud.

3. Message Routing with IoT Rules. Once data is published to AWS IoT Core, you need to route it to AWS IoT SiteWise. This is done using IoT Rules, which allow you to process, filter, and route messages to various AWS services based on the topic they are published to.

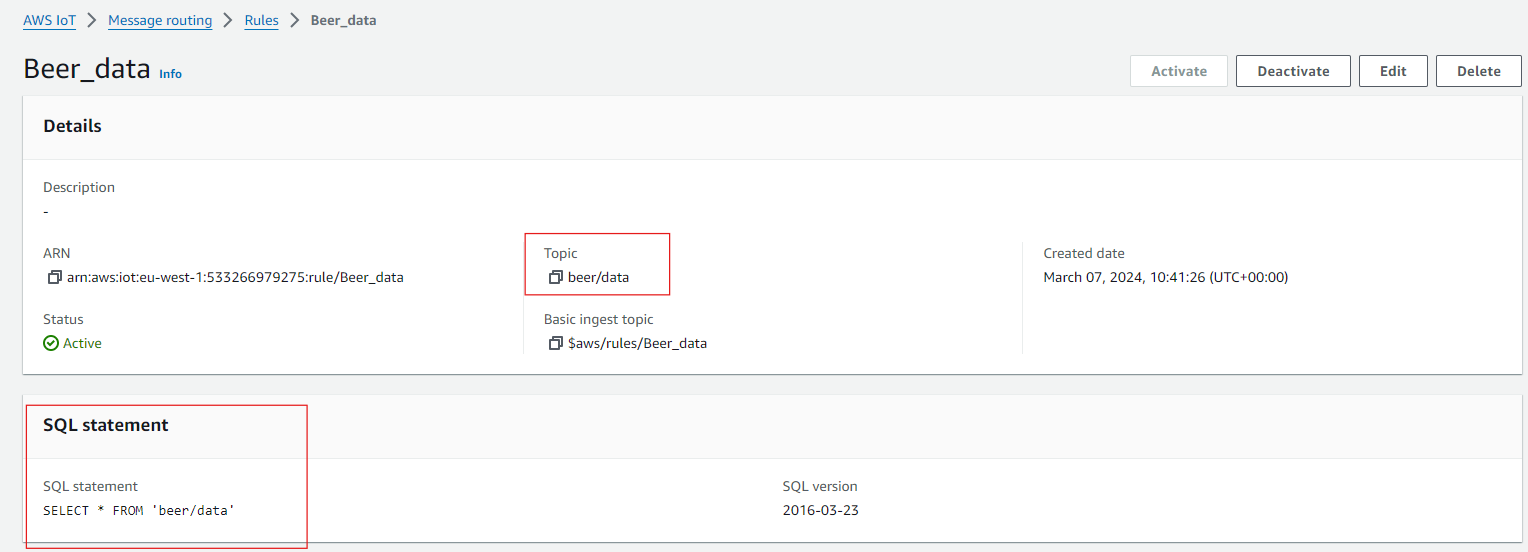
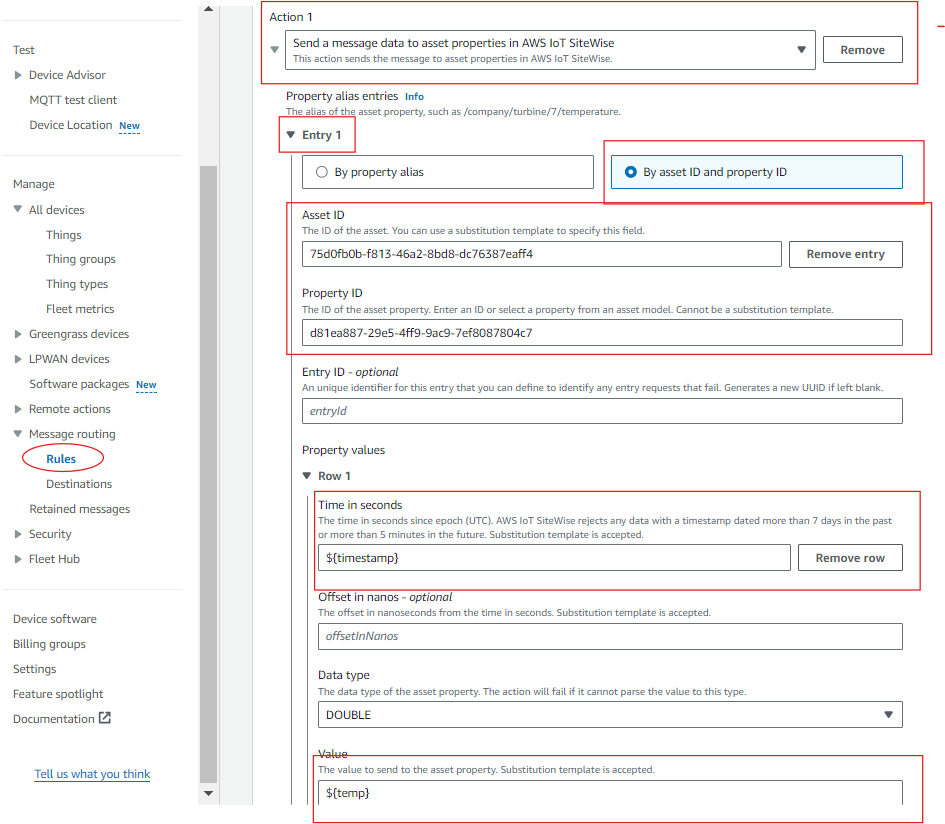
Create an IoT Rule: Define a rule that triggers when a message is received on a specific MQTT topic (e.g., beer/data). This rule will transform the incoming data, if necessary, and send it to the appropriate destination, which in this case is AWS IoT SiteWise.
Route Data to SiteWise: Configure the IoT Rule to send data directly to SiteWise, linking it to the appropriate asset model and properties that you've created.

4. Defining Assets and Properties in AWS IoT SiteWise. AWS IoT SiteWise organises data into assets, which represent physical equipment or processes. Each asset can have one or more properties that store sensor data or computed metrics.

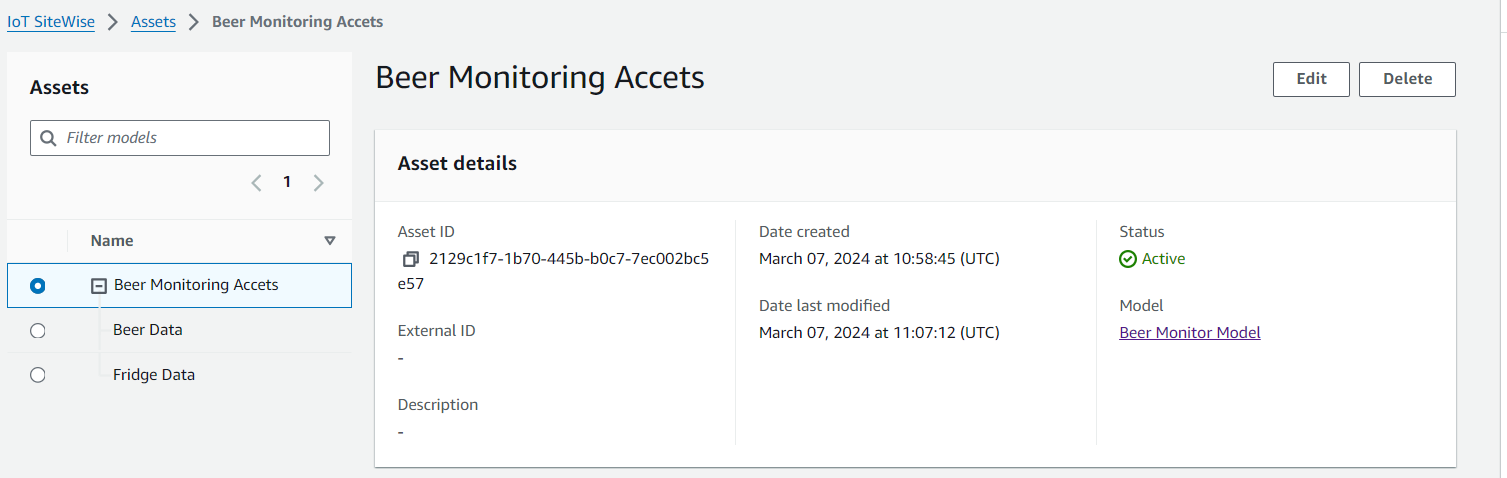
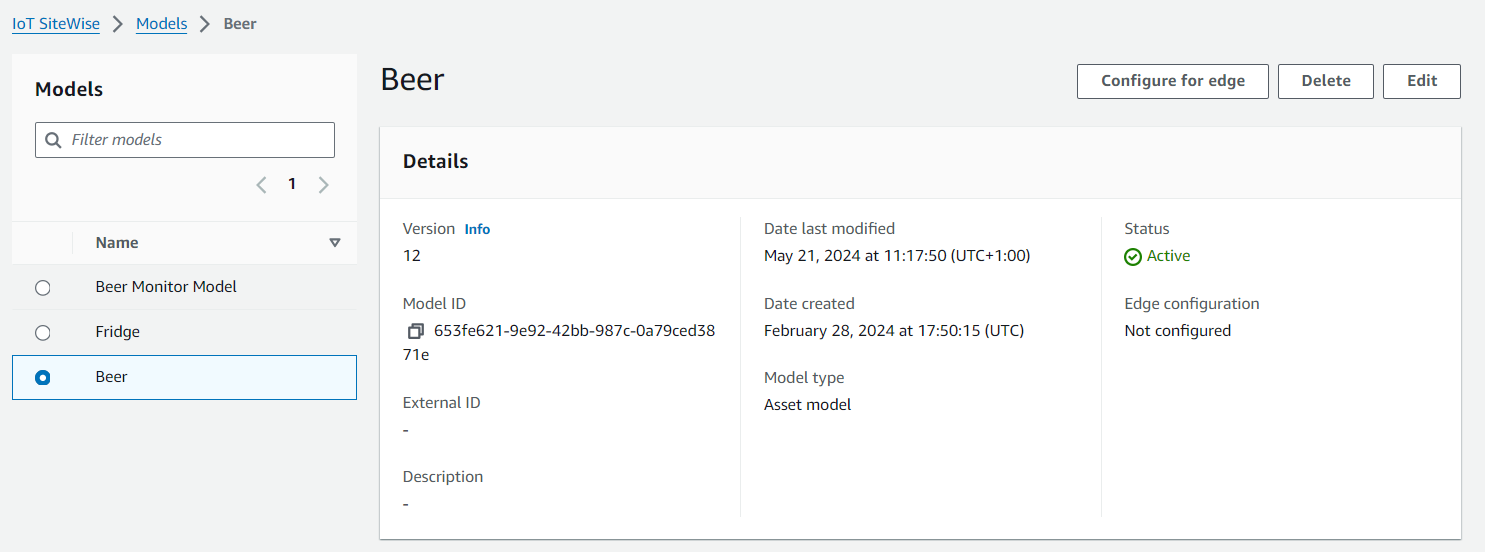
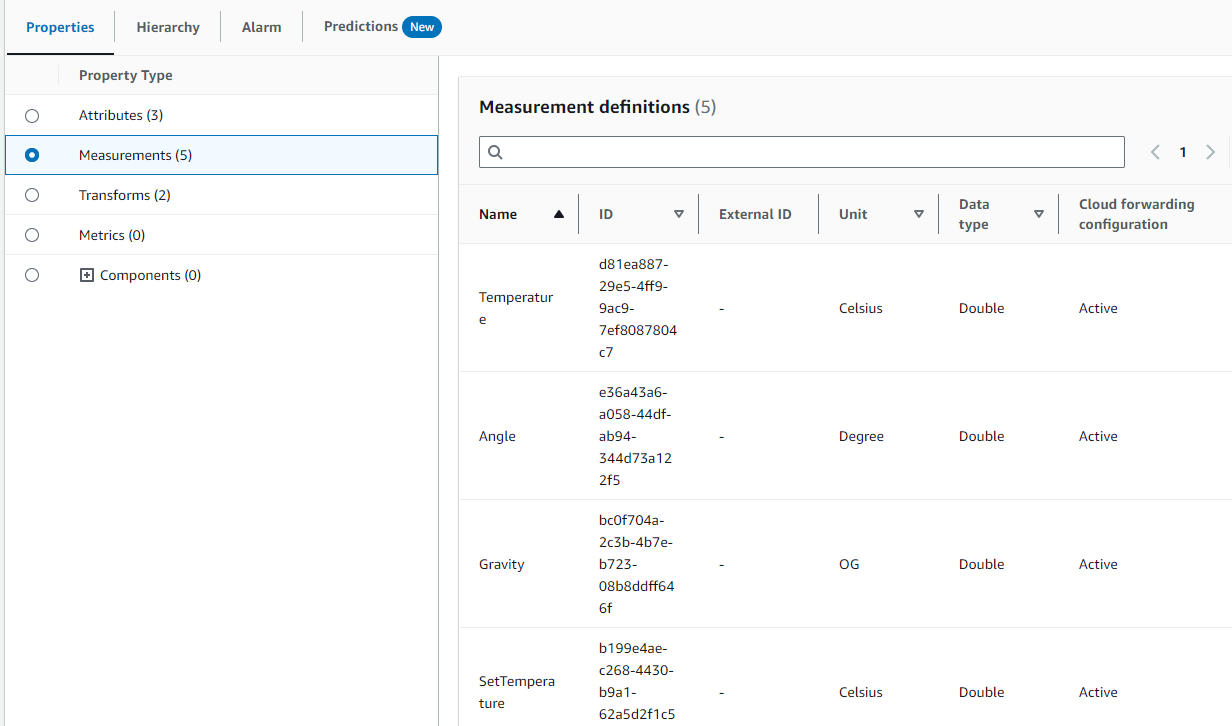
Create an Asset Model: In AWS IoT SiteWise, define an asset model that represents your equipment (e.g., beer, fridge). This model will have properties of temperature, angle, gravity and beer name.

Define Properties: For each sensor collection point (e.g., temperature sensor), define a property within the asset model. This property will store the data received from the IoT Core and mapped by the IoT Rule.

Assign Asset to the Model: The model defines the structure and characteristics of a type of equipment or process. It outlines what attributes, measurements, metrics, and relationships an asset should have. On the other hand, assets are a specific instance of a model, representing a real piece of equipment or component. It collects and stores real-time data according to the structure defined by the asset model.
Link the IoT Rule to Asset Properties: The IoT Rule you created earlier will map incoming MQTT messages to these properties, ensuring that the data flows directly from your device to the correct asset in SiteWise. For that, you need the asset ID and the properties ID which we pass to the IOT rule while defining them as shown above. Once set up, you'll be able to see real-time data reflected on the SiteWise asset properties.
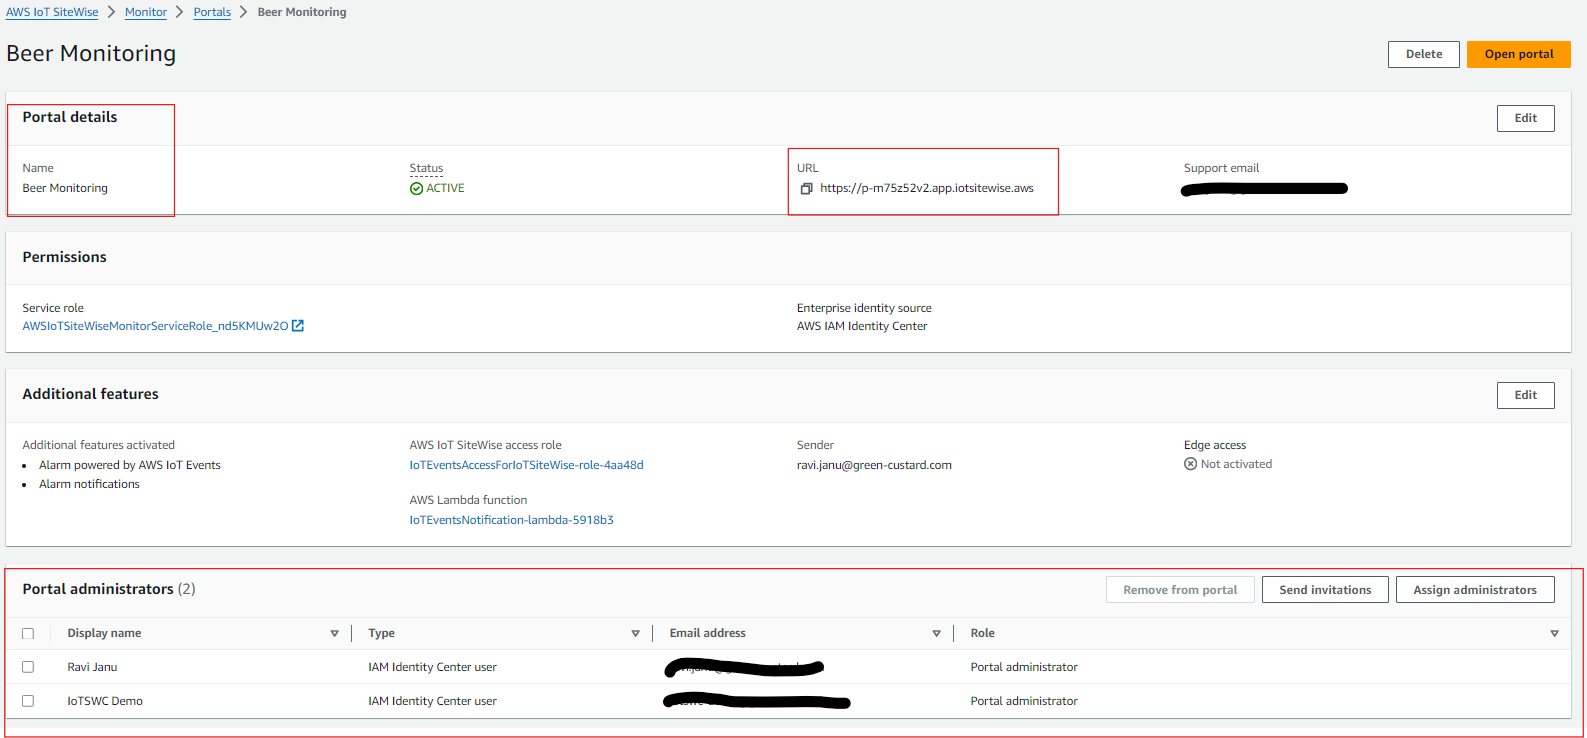
Next, you’ll need to create a Portal for your dashboard, where you can assign users who will access it using their access ID and password. You can add multiple users to the portal, granting either admin or user permissions to control access levels. After the portal is created, you'll receive a URL that allows you to access your dashboard directly.

5. Visualisation and Monitoring with AWS IoT SiteWise. Once the data flow is established, you can visualise and monitor the data in real-time using AWS IoT SiteWise dashboards:
Build Dashboards: Create visual dashboards in SiteWise to display data from your assets. You can add charts, graphs, and other widgets to monitor sensor readings and track key performance indicators.

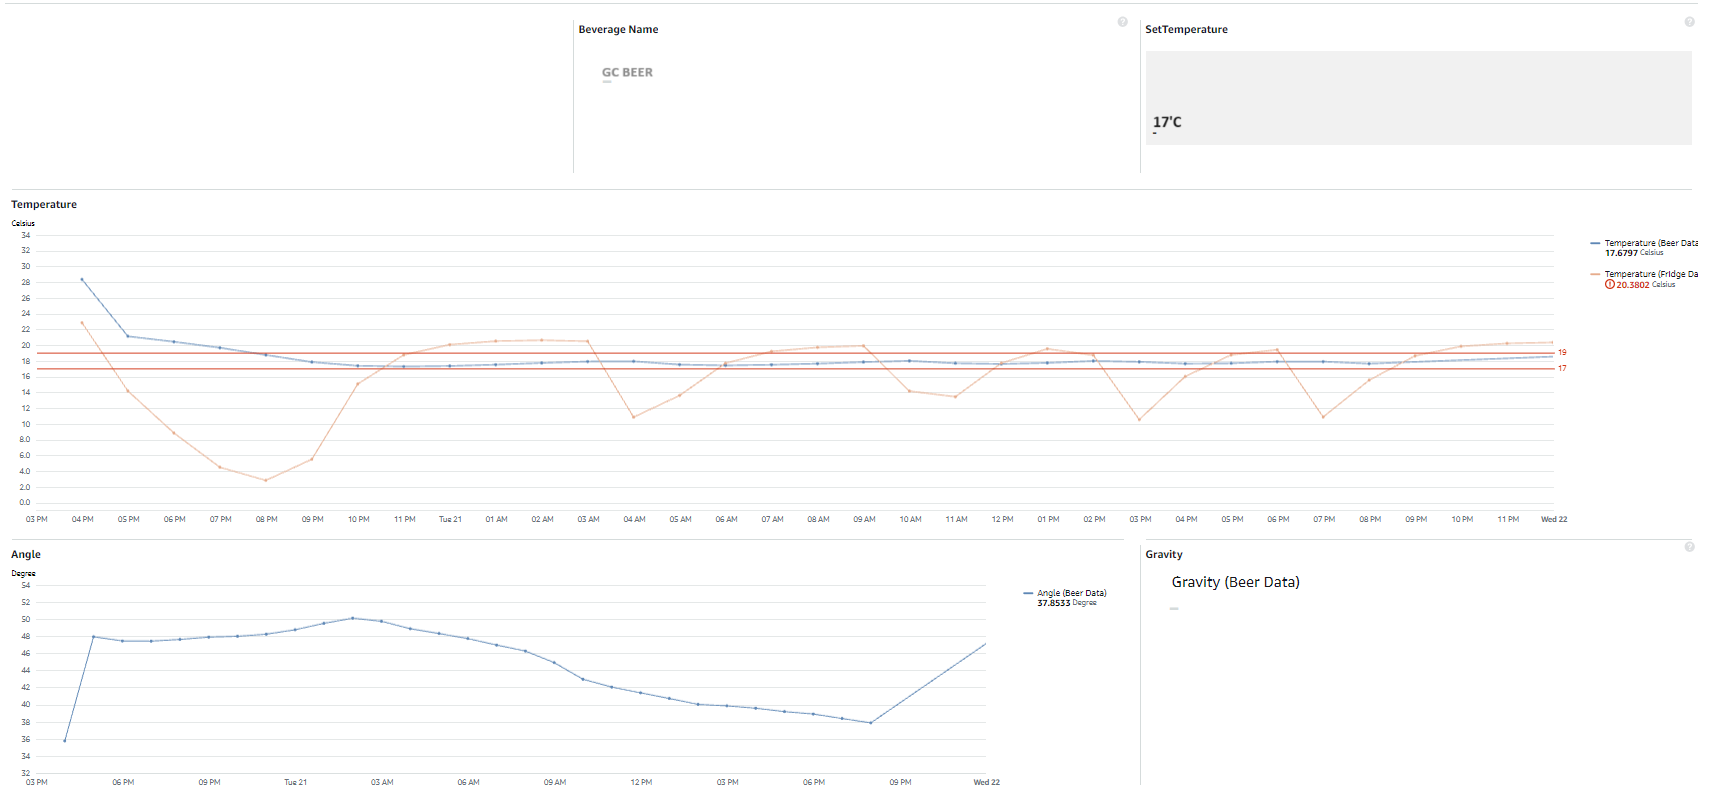
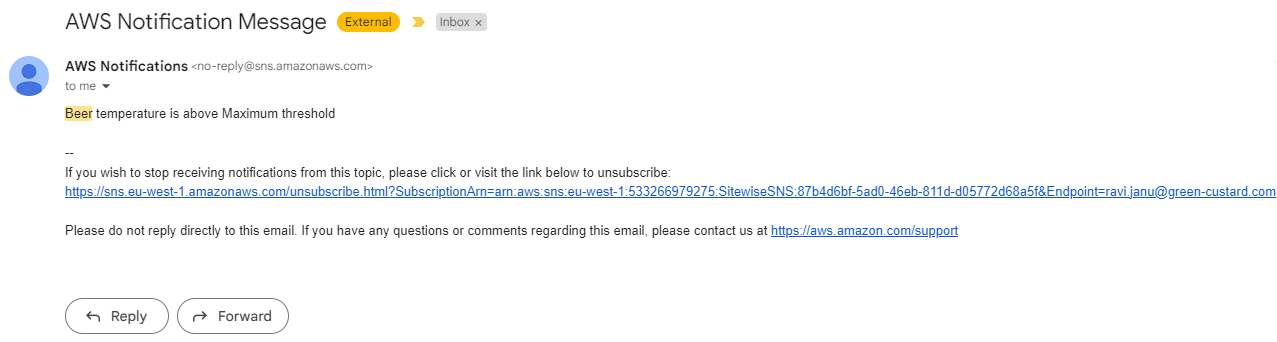
Set Alerts and Notifications: Use SiteWise to set thresholds and trigger alerts if sensor data exceeds certain limits, ensuring proactive monitoring and response.

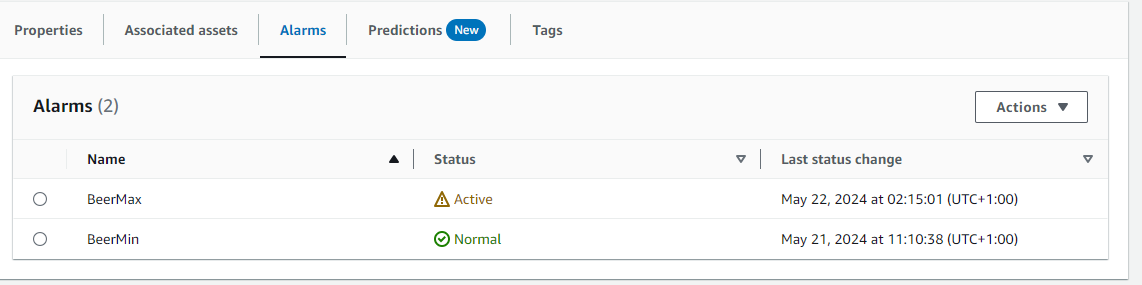
For email alert notifications you can set the email message while creating an alarm event.

Further scaling on this project
By leveraging real-time data from the fermentation process, particularly temperature monitoring and the density change of beer you can build extensive data models that, when combined with machine learning algorithms, provide predictive insights. These insights help anticipate potential issues and optimise fermentation conditions, ultimately improving product quality and reducing the cost of the process.
Additionally, deploying edge computing solutions could reduce latency and increase processing capabilities at the site, making the system more resilient and responsive. You could integrate AWS IoT Greengrass to extend cloud capabilities to the edge, allowing the Raspberry Pi to run local computations, store data, and trigger actions even when offline. This would be particularly beneficial for maintaining operations in remote or unstable network environments.
Finally, by scaling your visualisation efforts with Amazon Managed Grafana, an open-source analytics platform, you can query, visualise, and set alerts on your metrics, logs, and traces. This powerful tool enables you to create more sophisticated dashboards and provides a much better graphical representation of the parameter logs.
Conclusion
The integration of Raspberry Pi with AWS IoT SiteWise provides a robust and scalable solution for monitoring and controlling the beer fermentation process. With real-time data collection and cloud-based visualisation, this setup not only enhances the quality of the final product but also ensures efficiency and consistency throughout the brewing process. As the system evolves, there are significant opportunities for further innovation and scaling, making it an invaluable tool for both home brewers and large-scale commercial breweries.
Resources and References
https://www.asianbeernetwork.com/stages-of-beer-fermentation-fermentation-timeline/
https://grainfather.com/beer-fermentation-process/
https://www.ispindel.de/docs/README_en.html
https://docs.aws.amazon.com/iot-sitewise/latest/userguide/what-is-sitewise.html
https://docs.aws.amazon.com/iot-sitewise/latest/userguide/configure-rule-action.html https://docs.aws.amazon.com/iot/latest/developerguide/connect-to-iot.html
https://docs.aws.amazon.com/iot/latest/developerguide/iot-dc-testconn-provision.html